Written by Virginia George
Have you ever made a big batch of bone broth, simmered it all day, smelled the goodness, bottled it up, and then hesitated to use it because it would be gone? Maybe that’s just me, but when I found myself making broth, even in the slow cooker, I didn’t want to use it because then it would be gone, and I’d have to make more until I discovered perpetual broth.
I wish I could say that perpetual broth was my idea because it’s brilliant. When you remove liquid from your slow cooker to drink, make soup, or cook rice, simply replace it with filtered water. Continue in this manner for a week or so, bottle up what’s left in there, dispose of the bones, and start again. I’ll detail the process further below.
Why Bone Broth?
Making your own bone broth is beyond thrifty; it’s plain ‘ol cheap. But why? What is the benefit of cooking bones for hours, especially when using that handy powdered stuff you can keep in the cupboard?
Bone broth is a nutritional powerhouse. It contains many minerals, like calcium, phosphorus, magnesium, and potassium. It contains gelatin, which is very soothing and healing to the gut. There’s some truth to the old “chicken soup” remedy.
Traditionally, bone broth is made by simmering bones at a low temperature for a long period of time. On the stovetop, typically 6-12 hours minimum. I have been making mine in the crockpot for years and let it simmer on “warm” for 24 hours before using it.
Choosing Your Ingredients
Toxins like lead and fluoride can be concentrated in the bones, so it’s important to have a trusted source for your meat bones. If there is a Trader Joe’s near you, you may find organic chicken drumsticks much cheaper than a whole chicken. If you buy your meat directly from the farm, you can likely ask for soup bones.
Chicken bones can typically be used without special preparation because the chicken was likely cooked before it was deboned. Beef, however, benefits from roasting. I just put my bones in a shallow pan and roast at 350F for 45 minutes to an hour. Then I proceed with broth making!
While there is concern about lead in bones, I read an interesting article discussing the lead levels in organic broth found in a study by Medical Hypothesis. You can read the study abstract here. While the researchers found higher levels of lead in the broth than in the tap water it was made with, levels still fell several points below the EPA’s allowed level in tap water. It’s just a good reminder to source your ingredients carefully.
Slow Cooker Bone Broth
The best part about this recipe is there are no set ingredients aside from the apple cider vinegar and water. Simply add the ingredients you want in steps one and two, and then follow the remaining steps to create a minimal-effort bone broth.
Ingredients:
- Leftover bones and meat scraps
- Vegetable of choice
- Water
- Apple cider vinegar
Directions:
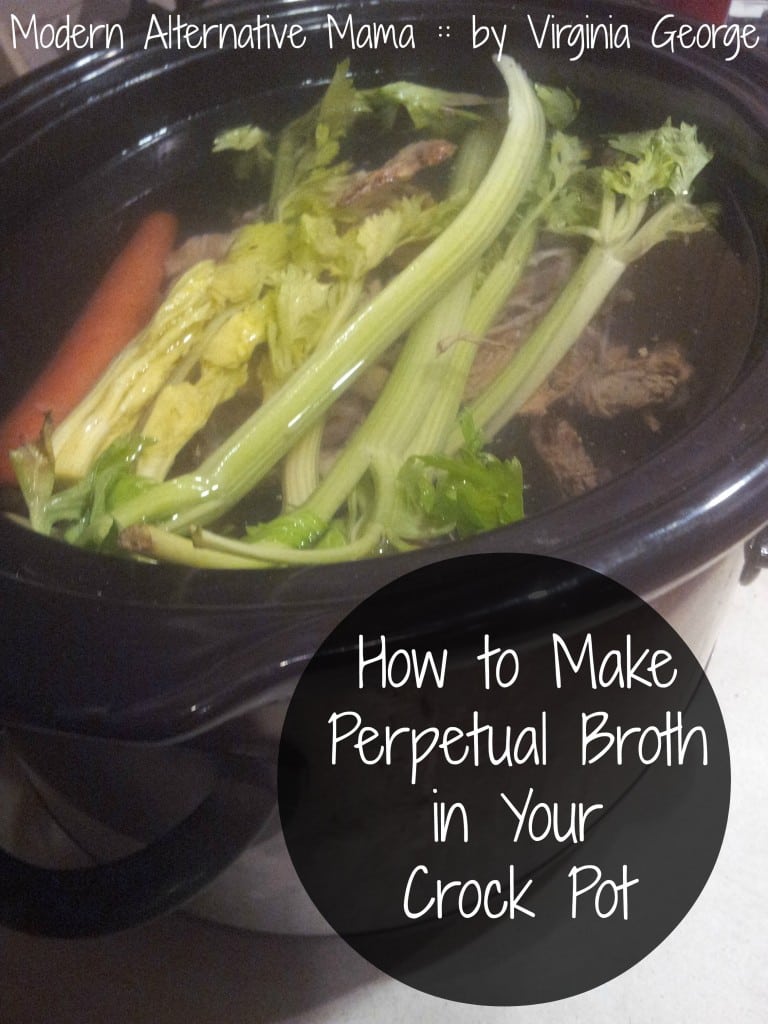
Step 1: Most people find that starting with cooked bones is best. Simply take your bones and leftover scraps of meat and place them in your slow cooker.
Step 2: Add some vegetables if you’d like, I typically add celery and carrot. You want to avoid vegetables with overpowering flavors like radishes, broccoli, cauliflower, etc. Onions may also discolor your broth, so keep that in mind if you use it. It’s a good idea to use organic vegetables for making broth, at least vegetables on the Dirty Dozen list. I stick with carrots and celery, a couple of bay leaves, and some whole peppercorns.
Step 3: Fill the crock with cool, filtered water and add a couple of tablespoons of apple cider vinegar (ACV). This is an important step, so try not to skip it, though you can. Adding the ACV will help draw the minerals out of the bones, so let it sit for an hour or two before turning on the crockpot.
Step 4: Turn the crockpot on low and simmer for 24 hours. I find my crock pot gets warm enough to barely boil on the “warm” setting, so after it is heated, I turn it to warm. In 24 hours, you’ll have a delicious, nutritious dietary staple far superior to the flakes in the cupboard. Each day, when you use your broth, simply remove what you need and replace it with more filtered water. I just scoop it out and pour it through a fine mesh strainer if vegetables or “other” things floating around.
Step 5: After a week, I draw off the remaining liquid and put it in the fridge. Then, I pressure can or freeze for another time and repeat the process.
Slow Cooker Bone Broth
Ingredients
- Leftover bones and meat scraps
- Vegetable of choice
- Water
- Apple cider vinegar
Instructions
- Most people find that starting with cooked bones is best. Simply take your bones and leftover scraps of meat and place them in your slow cooker.
- Add some vegetables if you'd like, I typically add celery and carrot. You want to avoid vegetables with overpowering flavors like radishes, broccoli, cauliflower, etc. Onions may also discolor your broth, so keep that in mind if you use it. It's a good idea to use organic vegetables for making broth, at least vegetables on the Dirty Dozen list. I stick with carrots and celery, a couple of bay leaves, and some whole peppercorns.
- Fill the crock pot with cool, filtered water and add a couple of tablespoons of apple cider vinegar (ACV). This is an important step, so try not to skip it, though you can. Adding the ACV will help draw the minerals out of the bones, so let it sit for an hour or two before turning on the crockpot.
- Turn the crockpot on low and simmer for 24 hours. I find my crock pot gets warm enough to barely boil on the "warm" setting, so after it is heated, I turn it to warm. In 24 hours, you'll have a delicious, nutritious dietary staple far superior to the flakes in the cupboard. Each day, when you use your broth, simply remove what you need and replace it with more filtered water. I just scoop it out and pour it through a fine mesh strainer if vegetables or "other" things floating around.
- After a week, I draw off the remaining liquid and put it in the fridge. Then, I pressure can or freeze for another time and repeat the process.
We consume much more broth now because I don’t have to worry about running out before I have time to roast another chicken. By the end of the week, the bones fall apart at the lightest touch because all the nutrients have been taken from the bones and put into the broth. This is a way to get everything you can from one meal!


Hello
I LOVE this ! Seriously ! Its very similar to what my former hubbies parents used to do many, many years ago. He said there was always a large pot on the back of the woodstove (yes they lived in the boonies). There they would throw in leftovers from dinners and more water (refilling as needed, daily). This was repeated everyday, as the ingredients would simmer down to blending into the broth. Every now and then they would strain the contents, save the broth and start again. He said they frequently had soups or his father (a cook in the army) would make something else including the broth into it.
I remember I thought he was crazy and then one day I decided to try it……. turned out they were right……. it was delicious. I now frequently do this, but freeze the resulting broth if I don’t need it.
Nice to see someone else re-starting an old tradition
The crock pot is such an easy way to make nourishing broth, and you don’t have to leave a fire on overnight!
Thank you for sharing your story! What a fun remembrance of delicious, wholesome food!
I simmered mine in the crock pot this past week for 3 days and it didn’t taste as good to me as when it is just simmered for 6 to 8 hours. Do you notice a difference in taste the longer you simmer it?
Hmm. I never really use it until at least 24 hours because it’s a lower cooking temperature than cooking on the stovetop. After several days it definitely is different than after the first 24 hours, especially if I haven’t used it much, but I’ve always thought the taste was fine.
I tried this broth method to save some money since we live bone broth but paying $5 a quart is just too much. I cooked the whole chicken for 24 hours, took the meat off the bones for a chicken soup and removed broth before filling it up again. After 48 hours it was still great. I removed more broth and refilled. But on the 3rd day I went to get the broth out and upon lifting the lid I was punched in the face with the smell of rancid meat. What did I do wrong and how did it go bad? I kept it going on warm in my slow cooker the whole time. Thanks in advance for you insight!
You do need to strain your broth every now and again. Vegetables like carrots, celery, onions, and garlic as well as meat bits can make the broth taste burnt even in a slow cooker. Strain EVERYTHING out, including little bits of meat. You will be left with about half the volume, that’s okay! Just add water. Remember… you are not throwing away nutrients. The nutrients are IN the broth. Adding water is a good thing! Just let it cook for a few more hours and you are good! After a few days of drinking the broth, you should strain it ALL, then, add more bones, then more vegetables, then, strain it all again! Just do it over and over….
Hi there! This sounds really interesting. Do you have to simmer the broth again after you added more water to replace the broth you took out? Or is the broth at the end of the week a watered down version of the original broth?
Thanks!
I leave my crock pot on “warm” the whole week, so it’s constantly cooking. At the end of the week the broth is actually often darker than at the beginning, full of rich flavor, and the bones nearly disintegrate when you take them out. This means that all that nutrition that was in those bones is now in your broth!
[…] wrote a post the other day over at Modern Alternative Mama about how to have broth all week long. I found it has been revolutionary for me. It’s never […]
[…] your own is quite simple. According to this article, burning bones (maybe left over from homemade stock?) and wood chips can make a great fertilizer along with leftover fish parts. Those three […]
[…] Perpetual stock (in the crock pot) […]
[…] is a link for Perpetual Broth. Basically, you make broth in your crockpot and then scoop out broth when you need it, and remove […]