Written by Kate Tietje
There’s quite a bit of controversy out there about the placenta. Does it have health benefits or not? Is it dangerous to consume? And the truth is, we don’t really know. We don’t have adequate research into consuming the placenta to say for sure that it is or isn’t beneficial. This lack of evidence has led most of the mainstream to state that it isn’t worth the “risk” and that it’s potentially dangerous (even though there’s no evidence of danger, either).
Of course, the placenta must be treated properly in order to be safe to consume. It isn’t hard at all, but it can feel intimidating when you haven’t done it before. I’ve done it twice now, so I’ll walk you through the how-to of encapsulation today. If encapsulation seems complex, you can always do a placenta tincture or check out my blog, 5 Ways To Use Your Placenta.
First, let’s look at the benefits (or potential benefits).
Benefits of Consuming the Placenta
Many people have stated benefits to consuming the placenta, including:
- Reduced risk of postpartum depression
- Even mood, lack of crying
- Extra energy
- Quicker postpartum healing
- Increased milk supply
- …and more
Most of these benefits are being reported by women who have tried it. Some women have only had babies and consumed their placentas; other women had had pregnancies where they didn’t consume the placenta and pregnancies where they did and noticed significant differences in their postpartum experiences and recovery when they did do it vs. didn’t. Especially since we lack “real” evidence, I think we should pay close attention to these experiences.
One study shows that the majority of women who consumed their placentas reported positive benefits and that they would do it again. The majority of studies, however, simply discuss attitudes towards consuming the placenta, asking why humans don’t (usually) do so when most mammals do, and note a need for actual studies. There really are no studies out there that truly look at the benefits — so we can’t really rely on this for information, unfortunately. Please note that lacking information is not the same as “no benefits.” It just means we don’t know for sure.
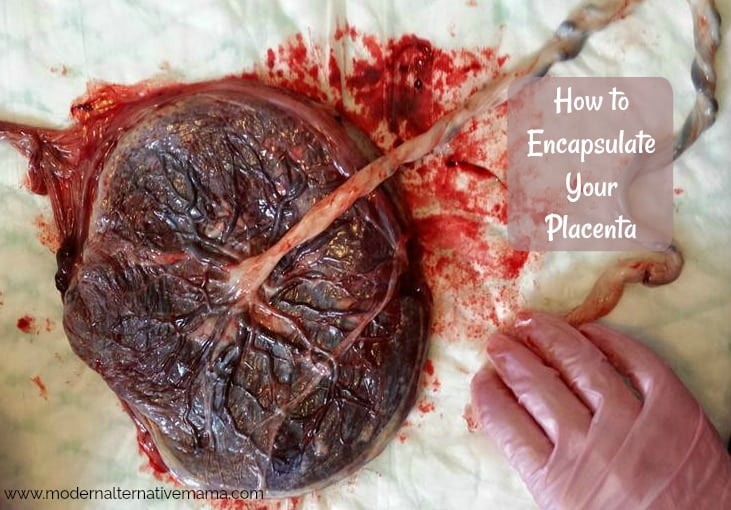
How to Encapsulate Your Placenta
Now that we’ve discussed the why-or-why-not, you will want to know how to do it if you’ve decided to go ahead. Know that many encapsulation specialists out there can do this for you. Some will do it raw, and some will steam it with specific herbs first. They will then use the following process.
For many women, immediately after birth is not a time they are willing to take on a DIY project. In that case, you may prefer to hire a specialist to do yours. This can cost $100 – $200 because it requires picking up the placenta on short notice, a fast turn-around time, and typically delivery of the finished capsules.
If you have someone willing to help you with at least the first couple of steps, you can easily encapsulate your placenta yourself. I have not found it difficult to do at all.
Ideally, your placenta should be processed within hours of birth. If you cannot do it within 2 – 3 hours, then you should put the placenta in the fridge. This will make it last up to 72 hours (but ideally, the process should be complete before that). If you cannot do it within 72 hours, freeze it instead. The placenta should not sit out too long or sit in the fridge too long, or it may become unsafe to consume — so always err on the side of caution in preserving it.
If possible, have someone dehydrate it immediately. Once dehydrated, it does not matter how long it takes to get to the next steps. It could be days, weeks, or even months (although this won’t exactly provide you much benefit), but once completely dried, it is safe and can wait.
So! How do you encapsulate your placenta?
You will need:
- Your placenta
- Capsules (gelatin or non-gelatin)
- Capsule machine (you can do without it, but it’s so much easier with it)
- Jar to store the finished capsules (I used a mason jar)
Step 1: Admire the beautiful placenta that nourished your baby for so many months. 🙂
Step 2: Cut off the cord and the sac.
Step 3: Rinse the placenta well to remove as much blood as possible. Again, with the messiness of it…
Step 4: Cut the placenta into thin slices. Small chunks are also fine.
Step 5: Dehydrate this at 150ºF (highest setting) for about 12 hours or until completely dried. You don’t want any moisture in this at all. If you don’t have a dehydrator (I have an Excalibur Dehydrator), you can use your oven on low (170ºF). When the placenta snaps or crumbles, it’s done. If it is bendy at all, it’s not.
Step 6: Once dry, run it through a spice grinder or blender to powder.
Step 7: This is where the capsule machine seriously comes in handy. It makes it super easy to encapsulate your placenta. I set up my little work area like this:
Step 8: Open your capsules — I chose gelatin capsules — and place them into the machine. Note which part of the capsule goes on which side because they are different!
Step 9: Add some of the powdered placenta to the ‘large’ end of the capsules.
Step 10: Scrape it across, and use the provided tool to tamp it down. Then add more if needed (typically, you will need to).
Step 11: Put the other side on top and press them firmly together. This closes the capsules. Then you have this!
Pop the capsules out and put them in a jar to store them.
Usage: There are various theories on usage. Most say you want to start taking them 2 – 3 days postpartum. I really don’t recommend waiting until several months postpartum. I did that last time, and when I began taking them, they messed up my hormone balance even worse. The idea is that you take them soon after birth, and they prevent your hormone levels from dropping too rapidly.
“Normal” hormone levels in pregnancy are about 3x what they are typically, and soon after birth, they can drop to even lower than normal for non-pregnant women, which is a huge shift. Use the placenta capsules to help with this shift!
Some recommend taking 1 – 2 every day, more if you feel like you want to. Others recommend starting at about 6 and stepping it back by a pill or two every few days until they’re gone. Many women feel that 6 is way too many. I’m personally taking 2 per day until or unless I feel like I no longer should. There’s really no “one” correct way to do this, so go with what works for you.

Thank you for writing such detailed, clear instructions! If I ever have another baby, I will still most likely be paying someone else to do this for me, but it’s nice that the info is out here for anyone who is interested.
I did encapsulate my placenta after the birth of my son. Since I only have the one birth experience (and therefore nothing to compare it to), I can’t definitively say it helped, but I can say that I never had problems with PPD or milk supply. I do know two people personally (who don’t know one another) who swear by placentophagy to help with depression; both were skeptical, but decided to try it once they recognized that they were dealing with something worse than “baby blues.” And for both, their symptoms immediately lessened. That was enough to convince me, and since I’m prone to depression anyway, I figured there could be no harm in getting my own placenta encapsulated.
I am due with #3 Jan 2 (after 11 yr break) and I want to do this. My midwife suggested I freeze it than break off chunks (pill size) and swallow. I have a dehydrator (drying stinging nettle right now) and I just might try it in pill form. I think I will more likely actually do it then..lol! I struggled with hormones after my other two which lead to unsuccessful breastfeeding. I want to give myself every chance to make it work this time. (-: I eat liver and have no problem with blood so I think I can handle my own placenta..lol! Most all other mammals do it why not us?! Thanks for sharing! I’ve been following you for a few months now and its nice to know that I am not the only alternative mama out there (of course I knew there were more but its great to follow a blog!)
[…] Placenta Encapsulation. You can read more about that here. […]
[…] forward a few kids and I was home-birthing, encapsulating my placenta, and skipping all unnecessary medical interventions. If I could go back to the beginning with my […]
Where did you get your encapsulation machine from and how much was it?
I got it from Mountain Rose Herbs. It was somewhere around $20.
[…] couple days ago, I shared how to encapsulate your placenta. Many women these days are opting to do so, and are experiencing great benefits from it. Click […]
Everything is very open with a precise clarification of the
issues. It was really informative. Your site is very helpful.
Many thanks for sharing!
Hello! What size capsules should I buy?
Most people choose to go with size 0 since it is smaller and thus easier to swallow.
Can you tell me what size capsules are used? I am going to be doing this for my daughter and I want to make sure they are not too big or too small.
You are so awesome! I am 44 years old and 30 weeks pregnant with surprise number 3. We are choosing a home birth and will be encapsulating the placenta thanks to your site. Your writings have inspired me and I have followed your journeys for a few years now through Facebook. I was so scared of this pregnancy and what would happen but you have truly made my fears seem so juvenile. I am actually looking forward to this new challenge and best of all, I know that my goal of being a doula was not so farfetched after all.
So you don’t need to steam the placenta first? I read another diy where the woman steamed here’s then dehydrated?
Hi!
Do you happen the shelf life of placenta pills, if kept in the freezer? I’ve gotten mixed answers. I’m nearing the end of my pills and would love to turn them into a tincture to prolong their use.